How To: Add Extra Storage Space to Your Microsoft Surface That Your Apps Can Actually Use
Microsoft's first venture into the tablet market, the Surface RT, combines many of the capabilities of a normal Windows 8 laptop into a super compact tablet, whose super-thin touch cover and kickstand can transform it into a functional mini-laptop, small and light enough to go anywhere you want. But like most tablets, the Surface comes with a rather limited amount of storage space. Image via microsoft.com The tablet comes in either 32 GB or 64 GB, but we all know that's not the actual amount of storage space you can use; It comes preloaded with about 13 GBs of Microsoft-related content, and once a disk is formatted, you end up with less usable space. As you can see from the chart above, the 32 GB and 64 GB start out with 3 and 6 GBs of space taken up before Windows 8 RT, recovery tools, and pre-installed programs (such as Office) are even included. So, that leaves you with 16 and 46 GBs of storage space available right out of the box.In order to gain some extra space, there's a few simple things you can do in order to add more storage for free (Skydrive, or any extra USB drives or microSD cards you have laying around) or cheap (a 64 GB class 10 microSD card is way cheaper than the 64 GB upgrade).There are a few caveats however, so let's get into the details.
Use an External Hard Drive or Flash DriveUnlike the iPad, your Surface comes with a full-sized USB port, so you can put most of your larger movie, photo, and music files onto an external hard drive or flash drive in order to save your Surface's built-in storage to install apps (which cannot be installed anywhere else).External drives have gotten smaller and smaller, so it really isn't all that bad having to carry one or two along with your tablet.Using this method, you won't have to worry about filling up your tablet with a bunch of files, while still having easy access to them. But what if you don't want to carry around extra devices?
Install a MicroSD XC CardWhile the 64 GB Surface costs $100 more than its 32 GB counterpart, you can expand the storage by 64 GBs for way less money by using an microSD card (another advantage the Surface has over the iPad). The Surface is compatible with either a regular microSD memory card or a microSDHC or microSDXC card. For the best performance, we recommend finding a Class 10 or higher card.
Put Your External Storage to UseHowever, there are a couple downsides to external and microSD storage versus internal storage:You cannot install apps from the Windows App Store on external storage. Microsoft manages all of the app storage in a new sandboxed security model. Metro apps such as Xbox Music and Videos currently don't let you browse music or videos from anywhere other than your Music and Video libraries. By default, these libraries do not (and cannot) include removable storage devices.
Trick Windows into Thinking Your Card Is Not RemovableWhile the app installation location cannot be changed just yet, you can trick your Surface (or any other Windows RT or Windows 8 device) into thinking your SD card is just a folder on your built-in drive, allowing you to add it to your music and video libraries that modern apps look at.Here's how...
Step 1: Create a Folder to Mount Your microSD CardGo the desktop, launch File Explorer, browse to your C: drive and create a new folder. This will be the folder you'll use to mount your microSD card. I named mine "SD".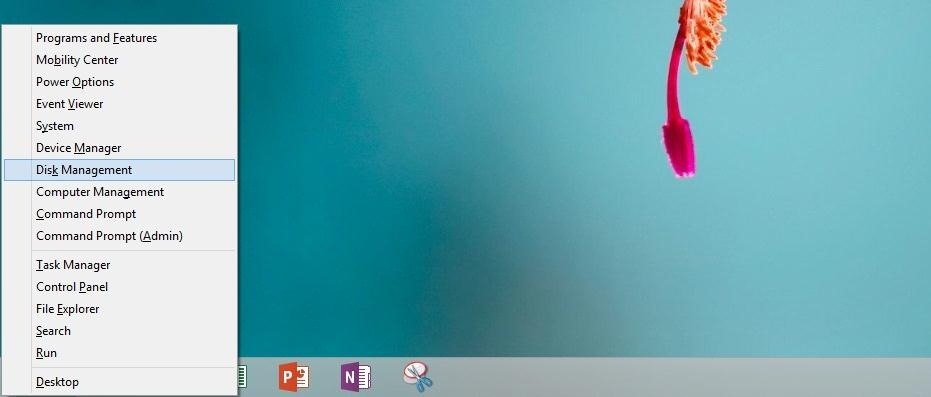
Step 2: Launch Disk ManagementThe easiest way to get there is to open the power user menu.If you have a keyboard, just press Windows Key + X. If you have a mouse, right-click in the lower-left corner of the screen. From the menu that appears, click or tap Disk Management. If you don't have a moue or keyboard, you can get to the same place by opening the Start Screen, and using the Search Charm (by swiping from the right-side of the screen) to search for "Disk Management". Tap Settings in the search sidebar to see the settings search results and select "Create and format hard disk partitions" to launch the Disk Management window.
Step 3: Mount Your SD Card as an NTFS FolderFrom the Disk Management window, right-click on your SD card (or if you don't have a mouse, tap and hold), and select Change Drive Letter and Paths.... In the windows that opens, click Add and then Browse... under the Mount in the following NTSF folder option. From the prompt that opens, Select the folder you created earlier on your C: drive (again, I called mine "SD") and click OK. Click "OK" again, and close out of Disk Management. Your SD card has now been mounted as a folder on you C: drive.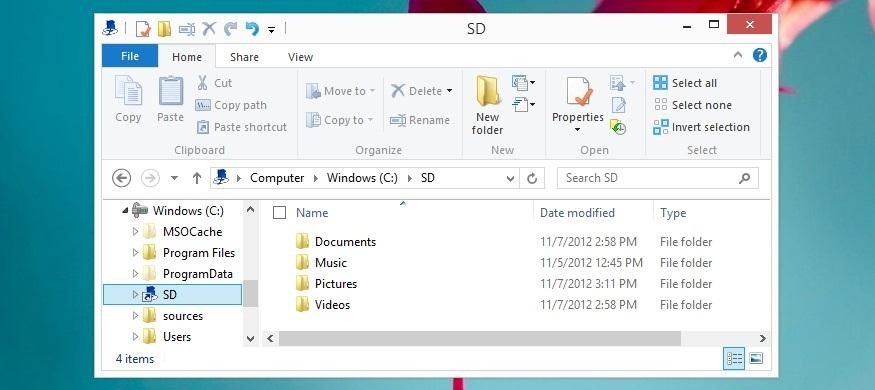
Step 4: Add Your SD Card to Your Media LibrariesYou're now ready to create sub-folders for your music, videos, pictures, and documents to store on your SD card.Go back to the File Explorer and navigate to the folder you created. It will now show you all of the contents on you SD card. As we want to store all of our music, videos, and documents here instead of on the internal storage, we're going to create new folders to link up with the appropriate libraries.So, create 4 new folders and name them Music, Videos, Pictures, and Documents. Now, just add each of the folders to their appropriate library by repeating the following steps for Music, Videos, Pictures, and Documents:Right-click (or tap and hold) on each Library folder in the left column and select Properties. Click Add. Select the appropriate folder in you mounted SD folder (ex. Music for the music library, Videos for the videos library, Pictures for the... well, you get the point). Click OK. If you'd like to save new music, images, documents, and videos to you SD card by default, you can select the newly added folder from the list in your library, and click the "Set Save Location" and "Set Public Save Location" buttons.And that's it!Now all of the music and videos you store on your microSD card will automatically show up in your Windows Store media apps.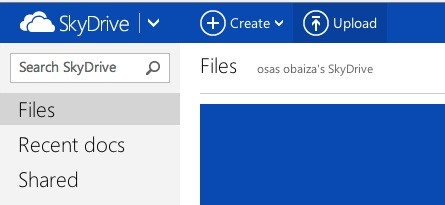
As a Free Option, You Can Also Use SkyDriveSkyDrive is Microsoft's cloud storage system. Similar to DropBox and iCloud, you can upload large or small files, and access them anywhere, anytime from your Surface. You also get 7 GB of free storage when you sign up.Once you've linked you account to SkyDrive, you'll be able to stream any music or videos you save in you SkyDrive using the built in apps... so long as you have an internet connection.
Cover photo by Ubergizmo
Windows 10 is the most cloud-oriented version of Windows to date—yet, while this means you get some nifty new features, it also means some of your personal data is being shared with Microsofts servers.
Windows 10 With S Mode Enabled, Everything You Need to Know
Enter your Apple ID password or use Face ID or Touch ID if it's available on your device. Then add the new keyboard. Go to Settings > General > Keyboard > Keyboards > Add a New Keyboard and select the app that you installed. You might need to set the keyboard to allow full access in order to use it. To delete a third-party keyboard:
Use your Smart Keyboard Folio or Smart - Apple Support
Video games are one of the few items that have successfully advanced and adapted over decades, while still holding its "old school" value. So, while I eagerly await the release of Grand Theft Auto 5, I still get amped to play classic Nintendo games like Double Dragon.
How to Play Nintendo DS Games on Your Samsung Galaxy Note 2
Thankfully, there are solutions such as AirDroid, an app that can help you with remotely managing your Android. In this guide, learn how to remotely manage your Android from a Web browser through
Read on and we'll show you how to leave or mute a group message chat on iPhone. For more insight into the various features offered by Messages, check out our How to use Messages on the iPhone guide.
How to Leave a Group Chat in Skype | Tom's Guide Forum
Using the app which we are going to mention here it is also possible to upload your video to cloud services like Dropbox and Google Drive. Upload Video to Multiple Sites At Once. To achieve this you will need to download Vid Octopus app. It is available on App Store and Play Store both. After installing the app use the steps below.
Upload Videos to Multiple Video Sites Like YouTube, Facebook
How to Prepare for International Travel. Traveling abroad can be a wonderful experience full of fun, history, and culture. It's important to prepare before you take your trip so that you'll have the best time possible, and avoid mishaps
How To Prepare and Use Your Cell Phone Abroad | SmarterTravel
News: The Latest Razer Phone 2 Leaks Suggest Project Linda Might Actually Happen By Jon Knight; Android; After the first image leaked of the upcoming successor to the Razer Phone, many were taken aback by its design, specifically how familiar it was.
How to Get Free Internet on Your Laptop from Your Phone
It is the main aspect that mother and fathers need to hack their youngsters' accounts without calling an expert. We desire to reveal you the very best methods to obtain Facebook password hack no study. The most effective means to hack someone's Facebook accounts. Technique 1: Hack Facebook without a password with GuestSpy application
5 Ways to Hack Facebook Account Online for Free
thetruthspy.com/blog-free-spyware-cell-phone/5-ways-hack-facebook-account-online-free/
This is the powerful spy app and easy way to hack Facebook account. With this app, you will have maximum opportunity to hack any Facebook account in an easy manner. Then, you want to learn the working of truth spy for this task.
How to Hack Your Friends Facebook Account Password 2019
Drag and Drop on the iPhone While Drag and Drop was primarily built for the iPad, there are a limited number of Drag and Drop features that also work on the iPhone. iOS 13 Will Turn Your
Drag & Drop Photos on Your iPhone in iOS 11 - Tech Viral
How to turn off emoticons in Skype for Windows 10? In every previous version of Skype, there has been an option to turn off emoticons. A lot of people like to type their own faces and emotes into chat and we do not want them being auto-converted into emoticons, especially when the 'translation' is wrong.
0 comments:
Post a Comment