How To: Make an Arduino Shield
Two years ago, driven by a good friend of mine i decided to give it a try on timelapse photography. I had a DSLR camera but didn't had an intervalometer, so i assembled a small electronic circuit on top of an Arduino Uno, made some basic code and did my first timelapse movie. The result was awful, but for some reason I was hooked.Since that day I have never stopped looking for ways to evolve. I studied and tried various techniques until i got better. But, as i got better i felt something was missing. I needed motion control to give my timelapse movies a cinematographic feel. So, i did a market research and found out that there were great timelapse motion control devices for sell, but all of them were to expensive for me. So i had the idea to make an Arduino shield keeping in mind that i needed to control, at least, 1 dc motor, camera focus, camera shutter and for the 2 remaining axis i chose to control the Skywatcher's Acuter All in One pano head (also tested with Virtuoso Mount).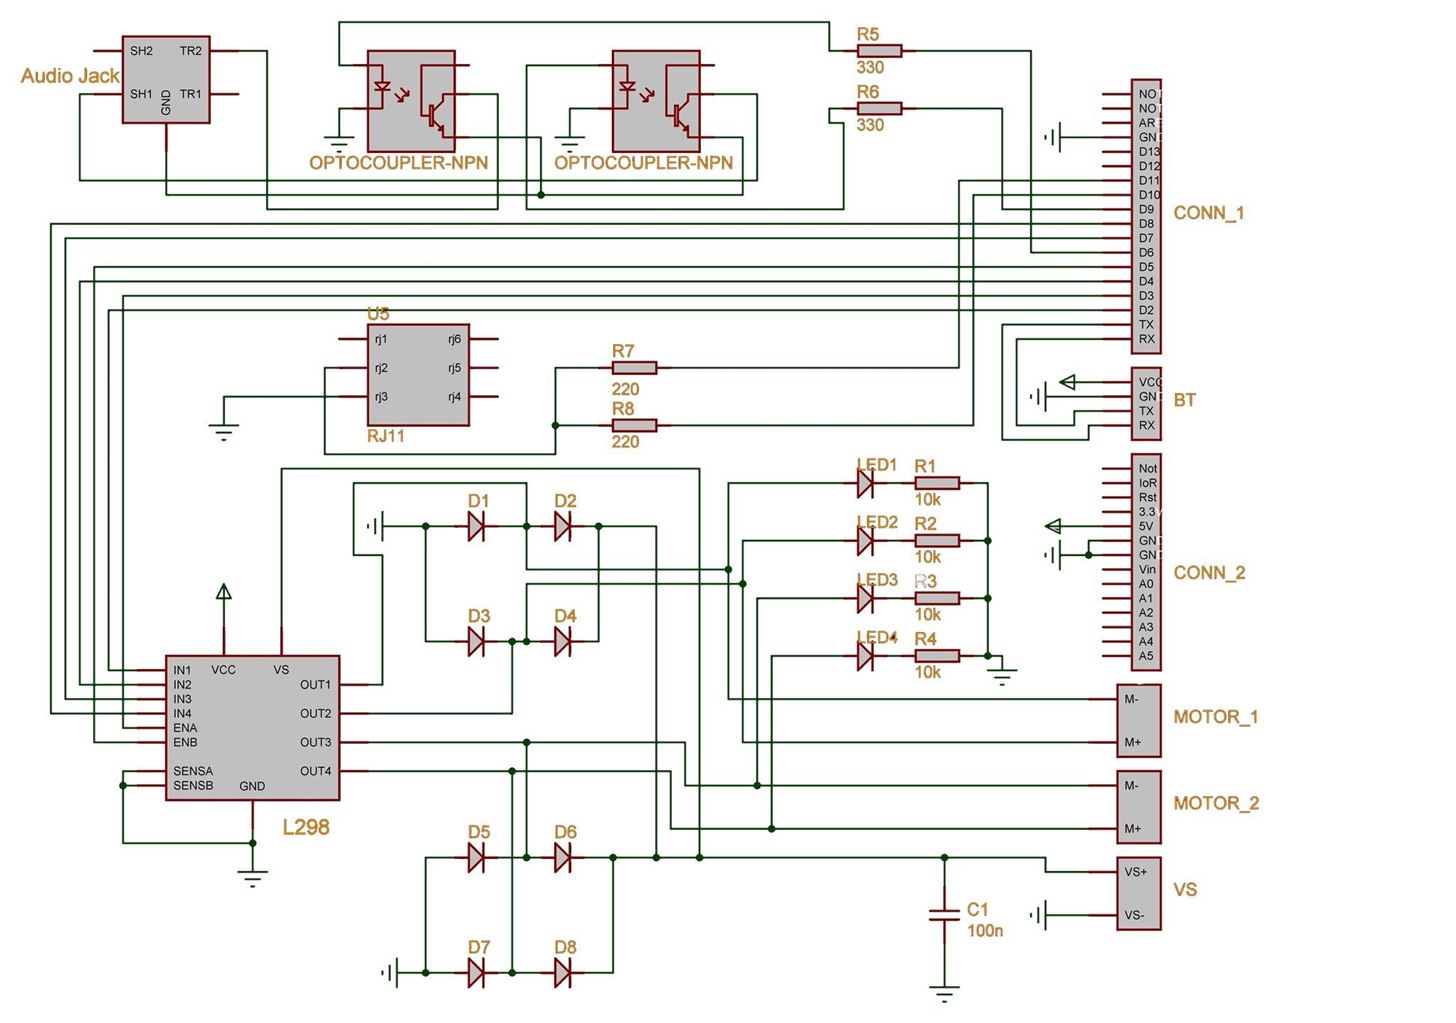
Step 1: Drawing the Schematics.Use an electronic design software and draw the following schematic.If the scheme is not clearly visible please download the pdf file.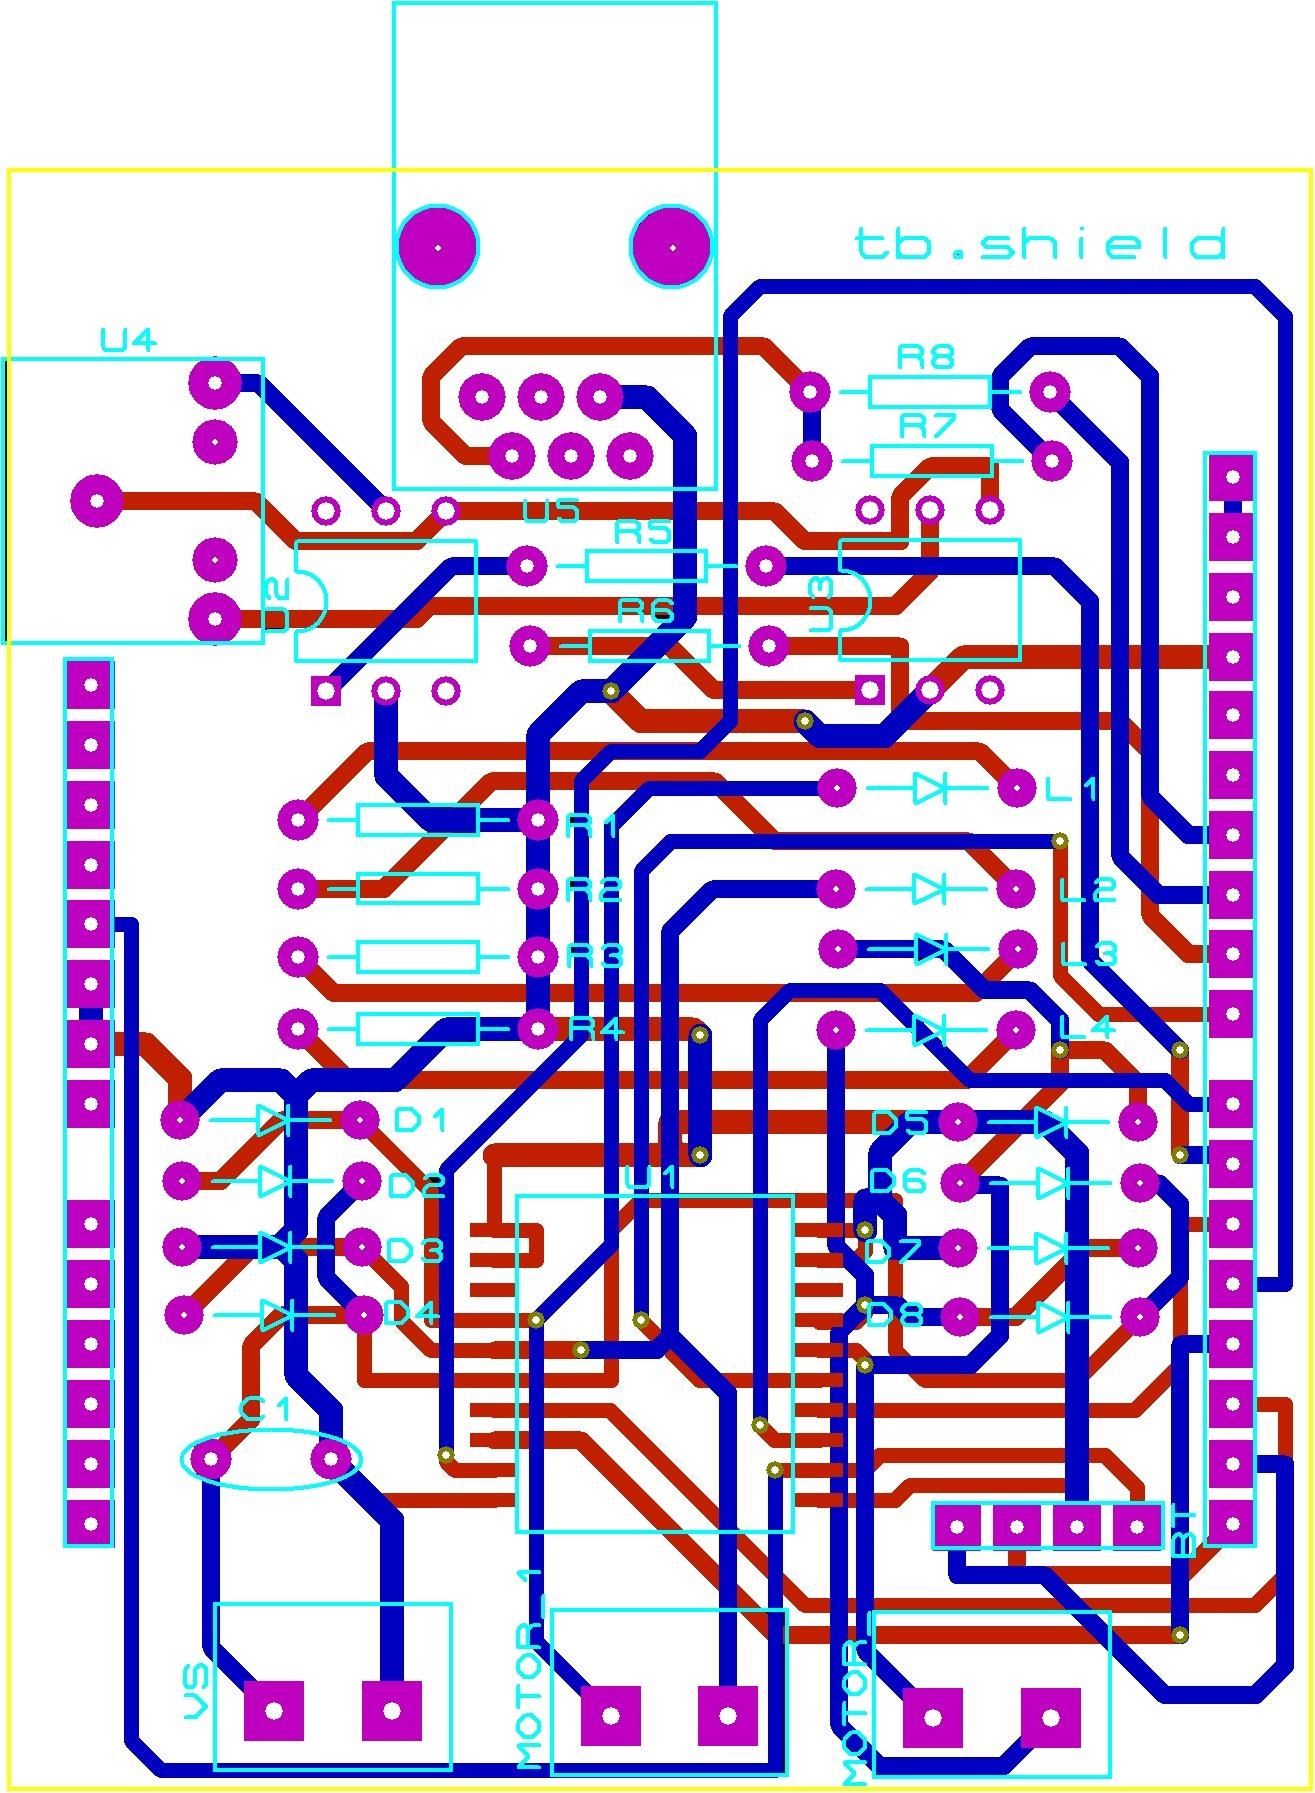
Step 2: PCBDraw the PCB layout.
Step 3: Gerber FilesMost of the electronic design softwares available will provide the ability to automatically generate the necessary gerber files to manufacture the PCB´s. If you don´t have one you can download the gerber files here: Gerber files.
Downloads |
This work is licensed under a Creative Commons Attribution 4.0 International License, which means that you can freely share, remix and make commercial use of this work as long as you attribute it to timeblocks.wordpress.com and keep the same license. I´ll update whenever I have new designs and/or code so don´t forget to like our facebook…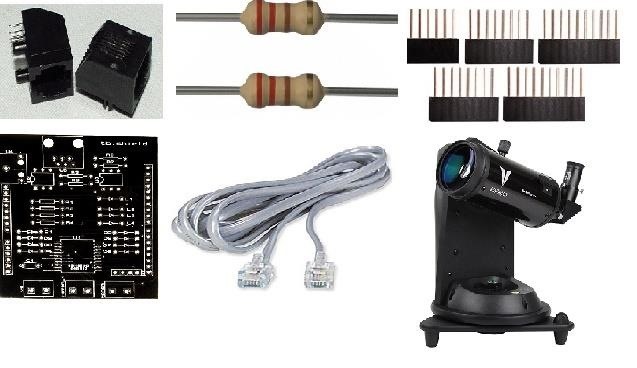
Step 4: First Test – Controlling Skywatcher Virtuoso Mount https://vimeo.com/100834758Picture of First test – controlling Skywatcher Virtuoso MountWhat you´ll need:1 x RJ11 connector 2 x 220 Ohm Resistor 2 x 8 pin Arduino Stackable Header, 1 x 6 pin Arduino Stackable Header and 1 x 10 pin Arduino Stackable Header 1 x Comunication Cable 1 x tb.shield PCB 1 x Virtuoso Mount Panohead Library and code: https://timeblocks.wordpress.com/downloads/Code:# include# includevoid setup() {panohead.init();}void loop() {long lngPositionPitch = 0;long lngPositionYaw = 0;//Read current positionlngPositionPitch = panohead.readAxisPosition(PANOHAXISPITCH);lngPositionYaw = panohead.readAxisPosition(PANOHAXISYAW);lngPositionPitch = lngPositionPitch + panohead.fromAngle(20.0);lngPositionYaw = lngPositionYaw + panohead.fromAngle(20.0);// 20 degrees motion in both axispanohead.driveToPositionBothAxis(lngPositionYaw, lngPositionPitch);delay(20000);lngPositionPitch = panohead.readAxisPosition(PANOHAXISPITCH);lngPositionYaw = panohead.readAxisPosition(PANOHAXISYAW);lngPositionPitch = lngPositionPitch + panohead.fromAngle(-20.0);lngPositionYaw = lngPositionYaw + panohead.fromAngle(-20.0);// 20 degrees motion in both axis in the opposite directionpanohead.driveToPositionBothAxis(lngPositionYaw, lngPositionPitch);delay(20000);}Now we just have to solder the RJ11 (U5 on PCB), the two 220 Ohm Resistor (R7 and R8 on PCB) and the stackable headers in the right places, connect everything and upload the code to the Arduino Board. The Virtuoso Mount should move the two axis 20 degrees in one direction and after 20 sec in the other one.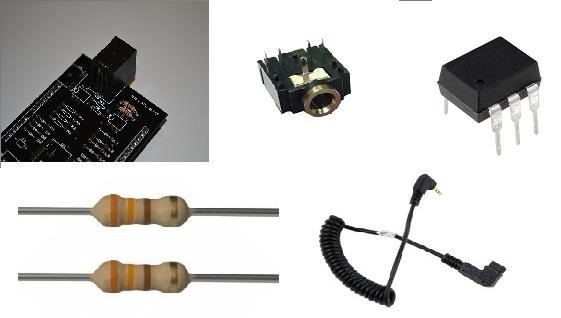
Step 5: Second Test - Controlling Camera Shutter https://vimeo.com/101553708Picture of Second test - controlling camera shutterWhat you´ll need:1 x tb.shield 1 x 3.5mm stereo audio jack 2 x optocoupler 4N25 2 x 330 Ohm Resistor 1 x release shutter cable The code: https://timeblocks.wordpress.com/downloads/# define PINFOCUS 6 // focus# define PINSHUTTER 9 // shuttervoid setup(){pinMode(PINFOCUS, OUTPUT);pinMode(PINSHUTTER, OUTPUT);}void loop(){digitalWrite(PINFOCUS, HIGH);delay(100);digitalWrite(PINSHUTTER, HIGH);delay(100);digitalWrite(PINFOCUS, LOW);digitalWrite(PINSHUTTER, LOW);delay(4800);}Now you just have to solder the 3.5mm stereo audio jack (U4 on PCB), the two optocouplers 4N25 (U2 and U3 on PCB) and the two 330 Ohm Resistors (R5 and R6 on PCB) in the right places, connect the camera to the 3.5mm stereo audio jack on the tb.shield and upload the code to the Arduino Board. The camera shutter should trigger every 5 sec.
Step 6: Third Test - Controlling Motors https://vimeo.com/101917574Picture of Third test - controlling motorsWhat you´ll need:1 x tb.shield 1 x L298P 8 x diode 4004 4 x 10k Ohm Resistor 4 x 5mm led 3 x 2 pin screw connector 1 x DC Motor 1 x 9v battery adapter 1 x 9v battery The code for motor 1:https://timeblocks.wordpress.com/downloads/# define PINM1DIRECTIONFW 2 // m1 forward# define PINM1DIRECTIONRV 4 // m1 reverse# define PINM1SPEED 3 // m1 speedvoid setup(){pinMode(PINM1DIRECTIONFW, OUTPUT);pinMode(PINM1DIRECTIONRV, OUTPUT);pinMode(define PINM1SPEED, OUTPUT);}void loop(){analogWrite(PINM1SPEED, 255);digitalWrite(PINM1DIRECTIONFW, HIGH);digitalWrite(PINM1DIRECTIONRV, LOW);delay(5000);digitalWrite(PINM1DIRECTIONFW, LOW);digitalWrite(PINM1DIRECTIONRV, LOW);delay(5000);digitalWrite(PINM1DIRECTIONFW, LOW);digitalWrite(PINM1DIRECTIONRV, HIGH);delay(5000);digitalWrite(PINM1DIRECTIONFW, LOW);digitalWrite(PINM1DIRECTIONRV, LOW);delay(5000);}The code for motor 2: https://timeblocks.wordpress.com/downloads/# define PINM1DIRECTIONFW 7 // m1 forward# define PINM1DIRECTIONRV 8 // m1 reverse# define PINM1SPEED 5 // m1 speedvoid setup(){pinMode(PINM1DIRECTIONFW, OUTPUT);pinMode(PINM1DIRECTIONRV, OUTPUT);pinMode(define PINM1SPEED, OUTPUT);}void loop(){analogWrite(PINM1SPEED, 255);digitalWrite(PINM1DIRECTIONFW, HIGH);digitalWrite(PINM1DIRECTIONRV, LOW);delay(5000);digitalWrite(PINM1DIRECTIONFW, LOW);digitalWrite(PINM1DIRECTIONRV, LOW);delay(5000);digitalWrite(PINM1DIRECTIONFW, LOW);digitalWrite(PINM1DIRECTIONRV, HIGH);delay(5000);digitalWrite(PINM1DIRECTIONFW, LOW);digitalWrite(PINM1DIRECTIONRV, LOW);delay(5000);}Now you just have to solder the L298P C.I. (U1 on PCB), the 8 diodes 4004 (D1 to D8 on PCB), the 4 10k Ohm Resistor (R1 to R4 on PCB), the 4 5mm leds (L1 to L4 on PCB) and the 3 x 2 pin screw connector (VS, MOTOR and MOTOR1 on PCB) in the right places, connect everything and upload the code to the Arduino Board.
Step 7: Make Amazing Timelapse Films. https://vimeo.com/101120640Now its time to make use of your fully assembled tb.shield and start making amazing timelapse movies. I hope you enjoyed this instructable.I´ll keep it updated. Feel free to comment.Have fun,PatrÃcio
This was due, in part, to the fact that Apple shipped a Lightning to 3.5mm headphone jack adapter with every iPhone 7, thus providing users who can't stand Apple's proprietary headphones with
Apple iPhone Xs will come with dual SIM capability - engadget.com
Improve Bluetooth Audio on Your Galaxy S9 with Custom Codecs Many Samsung fans were excited when the Galaxy S9 kept the 3.5 mm headphone jack. While this is a rare delight in 2018, you also have the option for high quality audio playback over Bluetooth.
6 Hidden Audio Mods for Your Galaxy S9 : GalaxyS9
A workaround that I frequently use on my Samsung Galaxy S4 is enabling flash alerts, which activate the LED when new notifications or calls come in. This still keeps things quiet but makes notifications much more noticeable when your device is in silent or vibrate mode, as the flash isn't easily ignored or missed.
How To Enable/Disable LED Notification On Galaxy - Rumors
How to Make a YouTube Video. This wikiHow teaches you how to set up, film, and publish a video on YouTube. YouTube videos can be as casual or as high-quality as you prefer; if you don't want to plan out your video, skip to the end of this
How To Make A YouTube Video Part 1 - YouTube
Professionally Lazy: Slack Off at Work Without Getting Caught How To: Cheat on a Test with an Eraser How To: This Trick Shows You Exactly When You Clicked on That Purple Link How To: How One Man's Python Script Got Him Over 20,000 Karma on Reddit—Without Cheating
How to block a program from accessing the Internet on Windows 10. This can be done through the Windows built-in Firewall. Steps are as follows. Step 1: Open Control Panel, and go to the Windows Firewall. Make sure you've turned on Windows Firewall in Windows 10. If not, turn it on.
How to Test Your Firewall - Lifewire
Dec 20, 2018 · On October 8th, Apple rolled out iOS 12.0.1 with a few bug fixes. For example, iOS 12.0.1 included a fix where some iPhone XS devices had a problem charging immediately after begin connected to a
How to Fix iPhone iPad Screenshot Not Working on iOS 11/12
Samsung just announced the Galaxy S10 lineup, but we already knew each device's every nook and cranny. Thanks to leaks and hands-on demos, we know the OEM kept the coveted headphone jack, but omitted one treasured feature in its place — the notification LED. Why did Samsung strip the S10 of this
How to Enable LED Flash Alerts for Calls, Texts, & Battery
If you even cannot open encrypted RAR file to view files saved in the archive, probably the RAR archive has been set password to encrypt file names. If you just could view files in RAR archive but cannot open them without password, probably the RAR archive has been encrypted with another way from extraction.
How to extract Password Protected RAR file without password?
We've described easy ways to free up space on your iPhone or iPad but that may not be enough for those who store a lot of data on their iOS devices. It's why we recommend that you pay a little
How to Free Up Space on iPhone (& Never Worry About - YouTube
How to Use Wii U Pro Controller on Iphone Ipad and Ipod Tech Muse. a suggested video will automatically play next. Up next 10 Video Game Controller Facts You Probably Didn't Know
Use your Smartphone as Wii-like Motion Controller to Play
techawakening.org/use-smartphone-as-motion-controller-to-play-browser-games/1602/
Find out how to use your iPhone and Android phone as Wii-like motion controller to play browser based games with Brass Monkey, video game console.
Get the Wii U Experience with the Smartphone You Already Have
0 comments:
Post a Comment